Mastering Git with IntelliJ IDEA and Bitbucket: A Comprehensive Guide
Git has become an indispensable tool in the world of software development, streamlining collaboration and version control for developers worldwide. Among the various Git hosting services, Bitbucket stands out for its seamless integration with Git and its robust repository management tools. Meanwhile, IntelliJ IDEA is a powerful Integrated Development Environment (IDE) renowned for its Git support and seamless workflow.
In this comprehensive guide, we will delve into the process of using Git with IntelliJ IDEA and Bitbucket to optimize productivity, foster collaboration, and maintain high standards in software development.
Prerequisites:
- A Bitbucket account: If you do not have a Bitbucket account, you can sign up for one at https://bitbucket.org/account/signup/.
- IntelliJ IDEA: Download and install the latest version of IntelliJ IDEA from the official website (https://www.jetbrains.com/idea/download).
- Git: Ensure Git is installed on your system. Download it from the official website (https://git-scm.com/downloads) and follow the installation instructions for your specific operating system.
Table of Contents:
- Creating a Repository on Bitbucket
- Cloning the Repository in IntelliJ IDEA
- Configuring Authentication for Bitbucket
- Making Changes and Committing
- Pushing Changes to Bitbucket
- Creating a Pull Request
- Conclusion
Step 1: Creating a Repository on Bitbucket
Before diving into the world of Git with IntelliJ IDEA, you need to create a repository on Bitbucket. A repository is a central storage location where you and your team can store, manage, and share your code. Follow these simple steps to create a new repository:
- Log in to your Bitbucket account.
- Click the “+” icon in the left sidebar and select “Repository” from the dropdown menu.
- Fill out the repository details, such as the repository name, description, and privacy settings.
- Choose the Git repository type.
- Click the “Create repository” button.
Step 2: Cloning the Repository in IntelliJ IDEA
After creating your Bitbucket repository, the next step is to clone it in IntelliJ IDEA. Cloning a repository means creating a local copy of the repository on your computer to make changes to the codebase. Follow these steps to clone your repository in IntelliJ IDEA:
- Open IntelliJ IDEA and click on “Get from Version Control” on the welcome screen.
- Select “Git” from the dropdown menu and enter the URL of the Bitbucket repository you want to clone.
- Choose a local directory where you want to clone the repository.
- Click the “Clone” button.


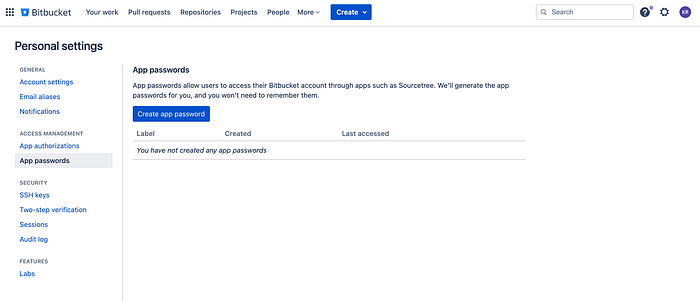
Step 3: Configuring Authentication for Bitbucket
To ensure secure access to your Bitbucket repository, you may need to configure authentication in IntelliJ IDEA. If you are prompted for a password while cloning the repository, create an app password in Bitbucket. App passwords are unique access tokens that allow you to perform specific actions on your Bitbucket account without sharing your primary password. Here’s how to create an app password:
- Log in to your Bitbucket account.
- Click your profile picture in the bottom left corner and select “Bitbucket settings.”
- In the settings menu, navigate to “App passwords” under the “Access Management” section.
- Click the “Create app password” button
- Enter a label for your app password and select the required permissions.
- Click the "Create" button and copy the generated app password.
- In IntelliJ IDEA, use your Bitbucket username and the newly created app password when prompted.
Step 4: Making Changes and Committing
With the repository cloned and authentication configured, you’re ready to start making changes to your code. As you modify your codebase, IntelliJ IDEA tracks the changes and allows you to commit them to your repository. To commit your changes, follow these steps:
- Make your changes to the code in IntelliJ IDEA.
- Select “VCS” > “Git” > “Commit” from the menu or use the dedicated “Commit” tool window.
- Review the changes you made and ensure they are accurate and well-documented.
- Enter a concise and informative commit message describing your changes.
- Click the “Commit” button.
Step 5: Pushing Changes to Bitbucket
After committing your changes, it’s time to push them to your Bitbucket repository. Pushing your changes updates the remote repository with your latest commits. To push your changes, follow these steps:
- Select “VCS” > “Git” > “Push” from the menu.
- Verify the changes you want to push and ensure they align with your project’s goals.
- Enter your Bitbucket username and app password when prompted.
- Click the “Push” button.
Step 6: Creating a Pull Request
If you want to merge your changes into the main branch of the repository, create a pull request in Bitbucket. Pull requests help facilitate code reviews and ensure that changes meet the project’s standards before they are merged. To create a pull request, follow these steps:
- Log in to your Bitbucket account.
- Go to the repository where you made changes.
- Click the “Create pull request” button.
- Fill out the pull request details, such as the title, description, and reviewers.
- Choose the branch that you want to merge into.
- Click the “Create” button.
Conclusion
Mastering Git with IntelliJ IDEA and Bitbucket can significantly improve your productivity and collaboration in software development projects. By following the steps outlined in this comprehensive guide, you can ensure that your team works efficiently and maintains high standards in coding practices.
As you continue to develop your Git skills, consider exploring more advanced features and best practices, such as branching strategies, rebasing, and resolving merge conflicts. To further enhance your Git knowledge, refer to our other articles on the Git Cheat Sheet and Using IntelliJ for Git.
By incorporating these best practices and leveraging the powerful tools and services available, you can create a lasting impact as a top-notch article creator and exceptional software developer. Happy coding!